Free Shipping over $50. No Sales Tax. We Price Match!
Whole Latte Love
Get the best price and expert advice! Call 1-888-411-5282
Get The Best Price And Expert Advice! Call 888-411-5282 We Price Match
Was $399.00
Sale Price $339.15

and Free shipping over $50, no sales tax!

You Save $59.85 (15%)

Comes with the following items:

  • Extended Warranty - 1 year

Also Available As: Refurbished

Colors (Click to See Larger Image):

Comparing the Gaggia New Baby with the Classic & B...
How To Use Pods With A Gaggia Espresso Machine...
Gaggia New Baby Espresso Machine...

General Specifications

Colors: Black . Ivory
Size: 15.7"H x 9.6"W x 10.4"D

Features

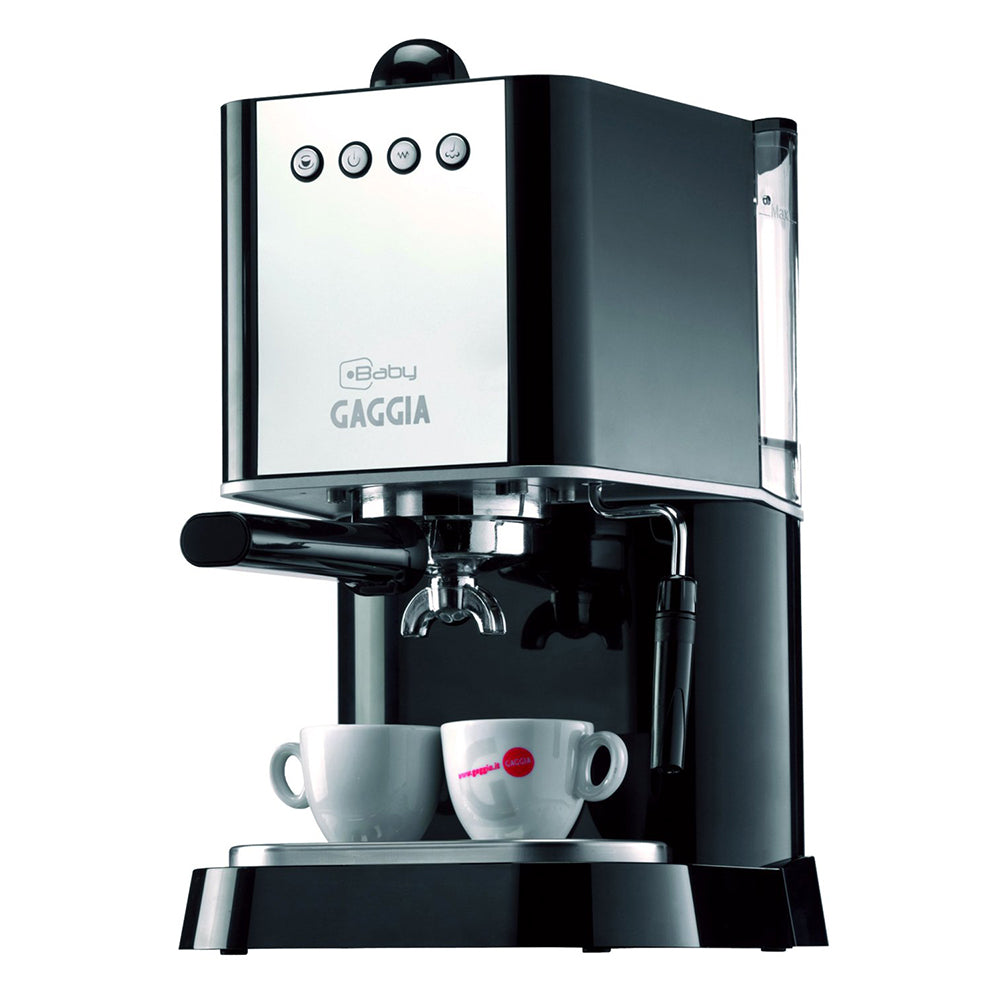
The Gaggia New Baby puts a new twist on a time-honored Gaggia design. A stainless steel front panel, updated control panel, and your choice of black or ivory housing create an elegant presentation for top-notch espresso brewing components. A commercial-style portafilter and group head, three-way solenoid valve, and ESE (Easy Serve Espresso) pod capability make this semi-automatic machine a versatile addition to any kitchen counter.

The control panel on the Gaggia New Baby is beautiful in its simplicity. Just 3 buttons on this espresso machine let you control all of the functions, from brewing delicious espresso shots to frothing pitchers of milk for cappuccinos and lattes. The Turbo Frother attachment on the steam wand makes frothing easy, so you can whip up plenty of delicious drinks for guests as an after dinner treat. Plus, the New Baby’s removable water reservoir and drip tray make cleaning a snap.

Top of Page

Features & Benefits: Coffee

Simple Controls

A 3-button control panel is located on the top front of the New Baby. These buttons, from left to right, control brewing, power, and heating the machine up to steaming temperature. In between the power and steaming buttons is the temperature indicator light that will illuminate while the boiler is heating up to proper temperature.

Commercial-style Portafilter and Brew Group

The New Baby has a commercial-style portafilter and brew group that are made of marine-grade brass. They are chrome-plated for a stylish look, and their brass construction offers excellent heat stability for your espresso shots. With a commercial-style portafilter, you can explore the art of traditional espresso making and have the ability to tamp your own shots.

ESE Pod Ready

For those who enjoy the convenience of brewing with ESE pods, the New Baby comes with a special filter basket just for that. ESE pods are pre-measured, pre-tamped packets of espresso that can be placed in the portafilter, brewed, and dropped right into the trash. They create consistently delicious shots every time you brew, and are perfect for espresso-lovers on the go.

Three-way Solenoid Valve

To ensure pressure is relieved from your group head after brewing, the Gaggia New Baby has a three-way solenoid valve. This results in precise pressure regulation as you brew and drier espresso pucks, so disposal is simple. Plus, there’s no need to worry about a soupy, dripping mess on your counters.

Fast-acting Boiler

The boiler on the Gaggia New Baby has 2 heating elements for even heat distribution. This also helps to make heat up a rapid process, perfect for mornings when you’re in a rush, or when making drinks for guests. Its 3.5 oz capacity also helps to ensure quick heat up time.

Top of Page

Features & Benefits: Frothing and Hot Water

Hot Water Dispensing

If you need hot water for americanos, tea, or hot chocolate, the Gaggia New Baby can instantly dispense it from the steam wand. Simply press the brewing button and open the steam wand using the knob on the top of the machine. When your desired amount of hot water has been reached, just turn the steam knob to the off position.

Turbo Frother

The Turbo Frother attachment on the steam wand lets even novices create luscious frothed or steamed milk for café-style drinks. This black plastic attachment directs steam into your pitcher evenly, so milk is quickly and effectively frothed. This is a great feature when entertaining guests who love cappuccinos and lattes.

Top of Page

Features & Benefits: Care, Maintenance, & Other

Water Reservoir

The water reservoir on the Gaggia New Baby has a 60 oz capacity, enough for almost 32 espresso shots. It can be easily filled in place, or removed for cleaning. Plus, the reservoir is made of clear plastic, so you can quickly monitor your water levels with a glance.

Removable Drip Tray

Few things are worse on an espresso machine than a complicated drip tray. To make cleaning simple, the New Baby features a drip tray that’s easy to remove. At the end of the day, it can be rinsed with warm water and cleaned with non-abrasive detergent.

Housing Construction

The Gaggia New Baby is housed in durable thermo-set plastic in your choice of ivory or black. Both colors feature a polished stainless steel front panel for a modern, attractive look.

Accessories

The Gaggia New Baby comes with a detailed instruction manual, coffee scoop, tamper, and single, double, and ESE pod filter baskets.

Top of Page

The Buzz

login to post
 

36 Posts
< Previous 1 2 3 4
Shanee Lemos what is difference between gaggia classic and new baby?
4:02 PM 5-9-12
Michael Rosso Shanee...Thank you for your interest in the Gaggia Classic and Gaggia New Baby. Both of these espresso machines have the same internal parts and use the same portafilter. The difference between the Classic and the New baby are as follows: The Classic housing is Stainless Steel the New Baby is ABS plastic. The Classic has Rocker Switches and the New Baby has Push Buttons. The Gaggia Classic water Reservoir is removed from the front of the machine and the New Baby's water reservoir is removed from the back.I hope this information helps, however if you have more questions please feel free to contact us directly at 1-888-411-5282 option 3 Thanks.
9:12 AM EST 5-10-12
 
Chad.Wentzky Hello, I was wondering what length of warranty this item comes with if purchased as a refurbished piece. Also, When does the Gaggia sale end, and what size tamper should be purchased to go with the machine. Thanks for your help, Chad
3:30 PM 3-31-12
Michael Rosso Chad...Thank you for your question on our Super Wall. The Refurbished Gaggia New Baby has a 6 month warranty and uses a 58mm tamper. I have no knowledge at this time as to when the Gaggia Sale will end. I hope this information helps, however if you have anymore questions please contact us directly at 1-888-411-5282 option 1. Thanks.
5:58 PM EST 4-2-12
 
Beverly Jerome I make Latte every morning. I have had it for about a month now. At the beginning when I was heating up the milk it foamed up nicely. That lasted about 2 weeks. It has been several weeks and the milk gets warm but it doesn't get the foam it use to get and doesn't double in size at all. I did leave the machine on for a while as I forgot to turn it off immediately. I am wondering if I am doing something wrong or could I have caused the machine not to operate correctly by leaving the machine on for too long. There was water in the resevoir when it was left on.
10:52 PM 3-29-12
Mark Jackson Beverly, You made need to take apart your wand and clean it. Try these two things. One take it apart and take a pen and make sure the black tip in the bottom is pushed out. Also make sure the small pin hole about three quarters of the way up is also cleaned out as well. This is usually the case. I will email a picture of what I am talking about and this should help and let us know if you need any more support.
8:32 AM EST 4-2-12
 
Scott Perry Periodically the water heats to the steam setting even though the steam button is not depressed. Sometimes the machine starts and runs fine, other times it heats immediately to the steam setting, still other times it starts fine, makes several good shots then suddenly heats to steam. Cleaning/descaling has no effect. Thermostat?
3:27 PM 1-30-12
Mark Jackson Scott, I am not sure about what exactly is going on. If you are heating the steam button at all. It could be a button or it could be a thermostat. You need to give our technical department a call and they can help troubleshoot. They will be able to ask you some questions and we can get started on getting your problem figured out.
9:59 AM EST 1-31-12
 
jim Tynan How would you compare this machine with the Delonghi EC702 and the Evolution? Just got the Delonghi. It seems like the coffee comes out to fast and is weak.
12:47 PM 1-3-12
Michael Rosso Jim...Thank you for your posting to our Super Wall. Here are somethings to comparisons between the Delonghi EC702 and the Gaggia New Baby. The boiler in the Delonghi is stainless steel and has a 1100 watt internal element. While the Gaggia has an aluminum boiler with two external elements with a total wattage of 1370 watt. The Delonghi has a stainless steel portafilter and the Gaggia has a chrome plated brass portafilter for better heat retention while brewing. Both of these machine use a 15 bar vibration pump to produce pressure for brewing. The Delonghi has a 44 ounce water reservoir and the Gaggia has a 60 ounce water reservoir. The reason your coffee is coming out too fast or weak from the Delonghi is that the grind is to coarse or not tamped enough. I hope this information helps, however ifyou have anymore questions feel free to contact us directly at 1-888-411-5282 option 1. Thanks.
11:16 AM EST 1-4-12
 
N Aeschliman I bought this machine for my husband last year for his birthday. We have not used it much as when we try to use it spray of coffee gets sent out in all directions from the portafilter. It is a mess to clean. Do you know what we are doing wrong?
12:51 PM 12-29-11
Michael Rosso N Aeschliman...Thank you for you posting on our Super Wall. It sounds like you are using the pressurized basket without the required little black pin. I hope this helps, however if you need more help please contact our Technical Support Department directly at 1-888-411-5282 option 3. Thanks.
1:43 PM EST 12-29-11
 
Martynas Sidlauskas does it makes regular coffee too ?
3:43 PM 10-20-11
Mark Jackson Martyanas, It will make espresso. You can make an Americano by adding hot water to it. Then it will be like a cup of coffee. Espresso machines brew coffee under pressure. So it is a little different then drip coffee by design. But an americano is something you could enjoy that is close to drip coffee.
12:09 PM EST 10-22-11
 
Kristin Gerhard Steiner Hey there... Bought the gaggia swing up from you all. Love it. Need a simpler machine for work... only do espresso.... no froth, no americanos. Have a 100 pack of lavazza pods that have sent me searching for a machine that will do it. What should I do... i want to use pods (not k cups). i want quick, good, clean coffee
10:53 PM 9-6-11
Mark Jackson get any Gaggia semi auto and the pod basket. Call us to get the order correct for you.
12:46 PM EST 9-7-11
 
Jon Lowe Greetings... We are ready to buy an expresso machine & really like what we have read about the Gaggia New Baby & the Gaggia Classic machines. Since they are the same price...which one would you recomend & why? Thanks! jon
3:34 PM 8-10-11
Mark Jackson Jon, They are very similar and I would most likely choose on looks so I would go with the Classic. I think you will be happy either way.
8:20 AM EST 8-11-11
 
Ardner Cheshire Where does your stock of refurbished New Babies come from? Also, why does the price of refurbished machines vary from month to month? Thanks.
4:45 PM 3-2-11
Michael Rosso Ardner...Thank you for your interest in the Gaggia New Baby espresso machine. Most of our refurbished machines come from returns under our buyers remorse program. The price may vary depending how much money it costs to refurbish the machines or we may feature them as a sale item. Thanks.
8:27 AM EST 3-3-11
 
36 Posts
< Previous 1 2 3 4

Gaggia New Baby Blogs

4 Blogs

Gaggia Classic, Baby Class and New Baby

Posted By: Michael Rosso
Posted At: Aug 29, 2011 at 8:49 AM
Related Categories: Semi Automatic Espresso Machines
643 views

We receive numerous calls from customers asking the same question, “What is the difference between the Gaggia Classic, Baby Class and New Baby?” Well in response to this question we have created a video showing you the similarities and the differences of these three machines.

Read Full Story

Gaggia New Baby Espresso Machine

Posted By: Whole Latte Love Staff
Posted At: Jul 18, 2011 at 8:18 AM
Related Categories: Semi Automatic Espresso Machines
444 views

With its great styling and formidable brewing ability, the Gaggia New Baby is the perfect machine for home use. Sure to impress, this machine has a commercial-style brew group, along with 3-way solenoid valve. It is also equipped with a Panarello steam wand for easy steaming and frothing. Check out my video; I'll show you exactly how the Gaggia New Baby works and what you can do to get the most out of this semi-automatic machine.

Read Full Story

How To Choose An Espresso Machine

Posted By: Mark Jackson
Posted At: Feb 8, 2011 at 3:29 PM
Related Categories: Coffee Talk
8372 views

If you would like to know a little about the many types of espresso machines we sell, this would be a good video to get you started. This video covers the machines we sell and based on your lifestyle, what you like to drink, and ease of use. It will give you an overview of different espresso machines and help you determine which one best suits to your needs.

I would watch the video and focus on a particular kind of machine—prosumer, semi-automatic, and super-automatic to decide which kind is ideal for you. Then, you can go and look at individual models to get a better idea of exactly what you want. Of course, if you narrow it down to a few espresso machines and are still undecided, give us a call and we would be glad to help!

Read Full Story

Brew First, Steam First. Which is it?

Posted By: Mark Jackson
Posted At: Jun 8, 2010 at 8:01 PM
Related Categories: Coffee and Espresso, Semi Automatic Espresso Machines
2588 views

Ok so you just received your new semi-automatic machine and are getting ready to make a nice cappuccino. You have watched the local Barista, done your online research and have quickly come to the conclusion that you are getting conflicting information on how to properly make a cappuccino or latte with your new machine. In some instances, you may have seen the drinks being made by brewing your espresso and then steaming and frothing your milk. Likewise, you may have also watched videos that show a latte being made in a glass cup where the espresso is being poured into the steamed milk. So which is it you might ask. "Do I brew first or do I steam first"?

The consensus with our team here is that it is better to steam/froth your milk first and then brew your espresso. This especially holds true when using a single boiler espresso machine like the Gaggia Classic or Rancilio Silvia. This serves three main purposes:

First, it is much more fast to make a latte or cappuccino by cooling the machine to brew after steaming then to wait for the machine to heat to steam after brewing. You can very quickly have the machine ready to brew simply by switching to the brew button and running hot water through the steam arm. The wand will change from producing steam to producing hot water very fast. Once you have hot water instead of steam you are ready to brew. This should take mere seconds with most mid level semis like the Gaggia machines.

Second, it is better for the machine and its internal components to be at the cooler brew temperature then the hotter steam temperature. In fact, Rancilio states in their manual that the steps mentioned in point one is necessary in the normal operation to prevent the machine from burning out heating elements and boilers.

Third, performing step one with the mid level semi-automatic machines is a great way to maintain a relatively consistent temperature when brewing. If you start brewing at about the same time after the steam turns to hot water you can maintain a consistent brew temperature with every shot. This is something known as temperature surfing which is a topic all of its own.

Read Full Story

4 Blogs
Currently Viewing Specifications | Show Performance Data

Specifications

Housing
Housing Material   Stainless Steel & ABS
Drip Tray   Plastic
Drip Tray Cover    Stainless Steel
Boiler Data
Material   Aluminum
Type   Volume
Wattage   1370
Heater Location   Twin Exterior
Volume   3.5 oz
Large Capacity   No
Brew Group Data
Material   Chrome plated brass
3 Way Solenoid Valve   Yes
Pump Data
Type   Vibration
Maximum Pressure   15 bar
Pump Wattage   55
Brewing Pressure   8 to 9 bar
Self Priming Pump   Yes
Controls
Switches   Push button
Programmable   No
Auto-Extraction   No
Pre-Infusion   No
Ready Lights   Yes
Thermostats   2
Back Pressure Relief Valve   Yes
Burn Out Protection   1 Thermal Fuse
Cup Warmer
Size   7x4
Material   Steel
Passive/Active   Passive
Portafilter Data
Type   Commercial
Material   Chrome plated brass
Handle   Plastic
Weight   16 oz
Diameter   58 mm
Filter Basket Material   Stainless Steel
Filter Baskets Included   Single, ESE pod & double shot
Pod Capable   Yes

Top of Page

Write a Review

Average Attribute Ratings

Ease of Use:
(4.9)

Espresso Quality:
(4.9)

Steaming Ability:
(4)

Construction:
(4.3)

Price Value:
(4.9)

Instructions:
(3.5)

Product Overall Rating:


4.8 Out of 5


Number of Reviews by Rating


(9)

(2)

(0)

(0)

(0)


Ease of Use:
(5)

Espresso Quality:
(5)

Steaming Ability:
(4)

Construction:
(4)

Price Value:
(5)

Instructions:
(3)

Excellent little starter machine. This is my first "real" espresso machine. I have only used steam machines in the past. However, this time I wanted a machine that will allow me to make a great drink. With the commercial porta-filer and the quick responding heating element it's fairly easy to get a decent shot and not too difficult to get repeatable great tasting espressos. The frothing wand is very good at making foam - probably too good. You get a bunch of foam, but not great micro-foam laden milk. I am looking at the replacement chrome foam attachment. One note for prospective buyers. Whollattelove states that this machine comes with single and double porta-filter baskets and an ESE pod basket. The new machine has been "dumbed down" somewhat and comes with a single and double pressurized filter basket and one doulbe commercial basket. If you want to make good single shots, you'll need to buy a single basket.

Show more...
Do You Find this Review Helpful?   Yes  No

Ease of Use:
(5)

Espresso Quality:
(5)

Steaming Ability:
(4)

Construction:
(5)

Price Value:
(5)

Instructions:
(3)

I have been using Espresso machines for about 18 years. This is my third machine and so far it is also the best machine I have owned. I have been using it dailly for about 3 weeks and I am very impressed. I have only used the steamer twice, so I can't comment much on it. I also am using the Portafilter from my old gaggia Carezza. I had some problems with the Portafilter on this machine spitting out Espresso...it got messy. The ports are open to the sides, so the pressure is such that it starts to spit or spew. My old Carezza's are straight down, so the problem goes away. However, having said that the machine itself is great. Has nice looks even with mostly plastic body. Operating the machine has been a breeze and the Espresso I am getting with Gaggia MDF grinder and some great coffee from the Kaffeeklatsch in Hsv, AL has been impressive. The crema is the most I have ever achieved. I hope to have this baby (pun intended) for a long time. Also, got a great price on this during WLL Xmas sale...sweet! Life is good. Probably a 4.5 overall.

Show more...
Do You Find this Review Helpful?   Yes  No

Ease of Use:
(5)

Espresso Quality:
(4)

Steaming Ability:
(2)

Construction:
(4)

Price Value:
(4)

Instructions:
(2)

When researching for an espresso machine, I wanted it to have two features: make a hot shot with crema, and have the ability to make many shots quickly. This machine has both features and does them well. I really like this machine. It makes a great cup of espresso and it is consistent with every pour. Before buying this machine, I tried a more expensive super-automatic and really did not like how inflexible it was with regards to shot strength. The Gaggia, since it is a semi automatic, can handle anything from a single shot to a super strong double shot, depending on which filter basket you use and how much coffee you pack in. This has been a great investment so far and I look forward to many more mornings with this machine. Even with the solenoid valve, the pucks sometime come out soupy, but I think that may be a function of my sub-par grinder.

How Long Have I Been Using This Product?

1 - 6 months

What's Best About this Product?

I like the design, speed at which it warms up and gets ready, and the consistency of the coffee.

Some Helpful Tips For Using this Product:

If you are looking for a nice entry-level espresso machine that performs well, this is the machine for you. It has a little learning curve so it is not for those who don't like fine-tuning their morning routine!

My Experience With Using This Product:

Coffee Lover

The Coffee I've Tried With This Product:

Joe Van Gogh, Melitta, First Colony, locally roasted beans

Some Improvements I Would Recommend for This Product:

The milk frother leaves a lot to be desired. Unfortunately, my 10 year old $20 Krups steam-powered espresso machine's steam frother is far superior! I'm not sure what the problem is with the frother, but it seems like it is almost TOO strong and heats the milk too quickly and the milk boils before it has the ability to firm up. The bottom of the frothing pitcher gets very warm, but the top is very foamy and cold. This is the only feature that could be improved. Note that with a little finesse, it is possible to get a nice froth but it's not as straight-forward as it should be.

Some of the Other Machines I've Used:

Jura Capresso F9

The Type of Grinder I've Been Using:

Blade grinder

The Make and Model of My Grinder:

Krups

Show more...
Do You Find this Review Helpful?   Yes  No

Ease of Use:
(5)

Espresso Quality:
(5)

Steaming Ability:
(3)

Construction:
(3)

Price Value:
(5)

Instructions:
(2)

Bought this as part of the machine + grinder package to replace a 3-year Saeco Superautomatic which just broke. I budgeted around $400 price range and narrowed down to Lelit and Gaggia, and went with Gaggia due to the 2-year warranty at WLL. Plus, I was a little worried about the water hardness and wanted machine that can take the Aqua Prima filter, which the Gaggia Baby does. Wow, I couldn't believe what I have been drinking for the last 3 years. It took some experiment to figure out the grind on MDF and tamp pressure. After about 6-8 trial and error, I settled on the setting 5 on MDF and hard tamp. The double shot came out beautifully with golden brown creama in 23-25 seconds, unlike my old Saeco which always seemed to be underextract, this came out just right. This machine is also the cheapest model from Gaggia that has 3-way solenoid valve. After brewing, the coffee puck was dry and easy to knock off. What I like the most is this gives me the option to try different beans at the same time since I just put in what I want to grind. It will be hard to go back to superautomatic again.

How Long Have I Been Using This Product?

Less than 1 month

What's Best About this Product?

Fast heat up time. Price/feature value. 3-way solenoid valve. Removable water take and support Aqua Prima water filter.

Some Helpful Tips For Using this Product:

For me the perfect setting on MDF to pull great shot is 5, and a little harder tamp (toward 30-40 lbs). I could also settled on the 4 and lighter tamp but I found it harder to control since the water seemed to leak through. Have tried with Ritual Coffee and Peet beans. Order a metal tamper - the plastic one which comes with machine is useless.

My Experience With Using This Product:

Coffee Lover

The Coffee I've Tried With This Product:

Ritual Coffee Evil Twin, Peet Espresso Forte,

Some Improvements I Would Recommend for This Product:

Steam wand. Better tamper. Position of steam knob is awkward.

Some of the Other Machines I've Used:

Saeco Superautomatic

The Type of Grinder I've Been Using:

Burr

The Make and Model of My Grinder:

Gaggia MDF

Show more...
Do You Find this Review Helpful?   Yes  No

Ease of Use:
(5)

Espresso Quality:
(5)

Steaming Ability:
(5)

Construction:
(5)

Price Value:
(5)

Instructions:
(2)

This is my second espresso machine, after a disappointing failure with the Starbucks Sirena. Gaggia New Baby is so much easier to use, and cleanup is a breeze. I get much better steamed milk with this machine, and it's easy to adjust your shots to get gorgous crema. This machine is easy to use, easy to clean, looks great, and makes wonderful shots and steamed milk. If you are having trouble with steaming milk, read the article called In-Depth Look at Frothing Milk on this website.

How Long Have I Been Using This Product?

1 - 6 months

What's Best About this Product?

Superior espresso, very easy to use and clean.

Some Helpful Tips For Using this Product:

Read the articles on this website for great information.

My Experience With Using This Product:

Coffee Lover

The Coffee I've Tried With This Product:

Starbucks Verona decaf, Starbucks Sumatra decaf, Illy decaf

Some Improvements I Would Recommend for This Product:

It would be nice to have the power switch on the front instead of the back of the machine. The instructions that come with the machine are poor at best. If I hadn't used another machine before, I might have been lost. If you are a first-time buyer, read other how-to articles and you should be okay. It's worth doing a little research.

Some of the Other Machines I've Used:

Starbucks Sirena

The Type of Grinder I've Been Using:

Baratza

The Make and Model of My Grinder:

Virtuoso (conical burr)

Show more...
Do You Find this Review Helpful?   Yes  No

Ease of Use:
(4)

Espresso Quality:
(5)

Steaming Ability:
(3)

Construction:
(3)

Price Value:
(5)

Instructions:
(4)

This machine is a big step up from my Saeco. It was easy to "dial in" and makes great espresso. I thought I was getting the good stuff when I bought the Saeco, but this is a big improvement in taste and quality. I don't use it to steam, I have an old steamer that thankfully still works.

How Long Have I Been Using This Product?

1 - 6 months

What's Best About this Product?

Great value for the money. Warms up quickly. Pulls great shots. I think the next step up from this would be a dual boiler machine. Great buying experience from Whole Latte Love.

Some Helpful Tips For Using this Product:

Buy your products from reputable companies like Whole Latte Love. I made the mistke of purchasing a grinder from Za.....i's. It performed very poorly and after a week of exchanging emails, they don't give out a phone number, I'm still stuck with it!!! My buying experince on the Gaggia was great and I'm confident help (if I need it) is only a call away.

My Experience With Using This Product:

Coffee Lover

The Coffee I've Tried With This Product:

various

Some Improvements I Would Recommend for This Product:

The drip tray could have a larger capacity, but I really like that I can fit larger cups under the portafilter.

Some of the Other Machines I've Used:

Saeco Magic

The Type of Grinder I've Been Using:

conical burr

The Make and Model of My Grinder:

Starbucks Barista - really good for the money Nemox Lux Plus - not good at all, at least for me

Show more...
Do You Find this Review Helpful?   Yes  No

Ease of Use:
(5)

Espresso Quality:
(5)

Steaming Ability:
(5)

Construction:
(5)

Price Value:
(5)

Instructions:
(5)

All I could ask for in my grinder.

How Long Have I Been Using This Product?

Less than 1 month

What's Best About this Product?

The ease in changing grinding settings.

Some Helpful Tips For Using this Product:

Service tech that took my order was great.

My Experience With Using This Product:

Coffee Lover

The Coffee I've Tried With This Product:

Whole Latta Love "Reflection", Decaf Whole Bean.

Some of the Other Machines I've Used:

This is my second Espresso Machine and both are wonderful. I could not ask for more!!!!!! Thanks Whole Latta Love.

The Type of Grinder I've Been Using:

Gaggia

The Make and Model of My Grinder:

I am in a wheelchair and cannot lift grinder.

Show more...
Do You Find this Review Helpful?   Yes  No

Ease of Use:
(5)

Espresso Quality:
(5)

Steaming Ability:
(5)

Construction:
(4)

Price Value:
(5)

Instructions:
(5)

I upgraded to the Gaggia New Baby (from the krups) and I cant believe I ever drank that other stuff! The gaggia is more demanding (you really need to have a decent grinder, a good tamp etc) but the payoff is great! The footprint on my counter is pretty big. The water tank is huge! and (not that I will ever use it) the frothing want is 3D swivel type. The machine heats up to HOT! (my last machine wasn't this hot)

How Long Have I Been Using This Product?

Less than 1 month

What's Best About this Product?

The Gaggia New Baby is easy to set up, and I was able to pull a decent shot in under 4 attempts.

Some Helpful Tips For Using this Product:

Get a nice tamper, get a good grinder and enjoy!

My Experience With Using This Product:

Coffee Lover

The Coffee I've Tried With This Product:

La Colombe (Nizza roast)

Some Improvements I Would Recommend for This Product:

The tamper that comes with the machine is kind of an joke. You need a decent 58MM tamper. I would have made the machine a little heavier (you need two hands to lock the filterholder into place.)

Some of the Other Machines I've Used:

Krups XP3040

The Type of Grinder I've Been Using:

Burr

The Make and Model of My Grinder:

Baratza Virtouso

Show more...
Do You Find this Review Helpful?   Yes  No

Ease of Use:
(5)

Espresso Quality:
(5)

Steaming Ability:
(5)

Construction:
(5)

Price Value:
(5)

Instructions:
(4)

I'm finally ready to review after 6 months of use. The machine was fine from day one, but that's not what matters. We get a consistently great long black, espresso or cappuccino every time. For the money (and you care about that if you are looking at this machine), this machine plus a nice grinder is far, far superior to the superautomatics - both of which died within five years of solid use and because their hoppers are so big, we sometimes had stale coffee. We still buy coffee by the kilo, and keep all but a small amount wrapped and frozen. We grind perhaps every three days. Make sure you spend the money for a good-enough grinder. If you spend much less than we did, you will lose the grind you actually need for a decent cup from this machine.

How Long Have I Been Using This Product?

6 - 12 months

What's Best About this Product?

Consistent, and no frills. The water bin is well designed so there's no dripping when you are filling it. Plus, it actually fits under the refrigerator spout. Good value.

My Experience With Using This Product:

Coffee Lover

The Coffee I've Tried With This Product:

Lavazza

Some of the Other Machines I've Used:

Saeco Superautomatic, Gaggia Superautomatic

The Type of Grinder I've Been Using:

Burr

The Make and Model of My Grinder:

Virtuoso Baratza

Show more...
Do You Find this Review Helpful?   Yes  No

Ease of Use:
(5)

Espresso Quality:
(5)

Steaming Ability:
(3)

Construction:
(4)

Price Value:
(5)

Instructions:
(3)

I really like my Gaggia New Baby so far. I received many free extras when I bought it from WLL, but I was missing an espresso cup. I called them and they said they would send it, so service as been good so far. At the time I received the machine, there was an ice storm in Portland so I could not get my hands on any fresh Stumptown beans, which is my favorite local roaster. I had to use the WLL Buzzopolis or Monaco beans that came free with the Gaggia. I had very low expectations considering they had just been shipped across the states. The first shots were very impressive: Guinness effect with nice, lasting crema. Nice job WLL! The shot came pretty fast though, maybe 18 seconds. I messed around with a finer grind and a harder tamp, but couldn't slow the shot down. My tamper is too small for my PF so that could definitely be a factor. Regardless, the shots were very good. The solenoid valve is great because you knock out solid dry pucks. I'm still getting used to the steam wand, which is a little quirky. It is very short, but it can do the job either with the attachment or without. I have only used the attachment with the top part screwed on and not the bottom "froth enhancing" thing. Either way, I can tell it can get the job done if you are frothing a smaller amount of milk.

How Long Have I Been Using This Product?

Less than 1 month

What's Best About this Product?

The portafilter is great, very professional. Makes great espresso.

My Experience With Using This Product:

Coffee Lover

The Coffee I've Tried With This Product:

Whole Latte Love Buzzopolis, but will use Stumptown Hairbender and WLL Monaco.

Some Improvements I Would Recommend for This Product:

Stream wand could be a little longer. It would also help if it would rotate a little easier. I have trouble pointing it into the drip tray when I want to flush the wand. Making it a little longer would solve this problem as well.

Some of the Other Machines I've Used:

Breville Ikon

The Type of Grinder I've Been Using:

Breville Burr Grinder

The Make and Model of My Grinder:

Ikon

Show more...
Do You Find this Review Helpful?   Yes  No

Ease of Use:
(5)

Espresso Quality:
(5)

Steaming Ability:
(5)

Construction:
(5)

Price Value:
(5)

Instructions:
(5)

Out of the box it was a bit taller than I expected, but it fits on our counter & under the cupboards - just kind of a shock. Very first shots I pulled were perfect and in the right amount of time. I didn't realize how "bad" our old shots were tasting until I tried these two shots in a plain latte. Very smooth, nothing bitter, sour, or appalling to my palate. I guess my old machine wasn't as up to par as I thought, it wasn't bad, but I had gotten used to okay coffee.

How Long Have I Been Using This Product?

Less than 1 month

What's Best About this Product?

I like that it operates very simply and much like my old Saeco, I read the instructions through and through, but I wouldn't have needed. But really what I like best is IT MAKES GOOD COFFEE!!!

Some Helpful Tips For Using this Product:

Take some time to learn the nuances of grind and tamping for this machine and you will be very happy. When you turn it on notice the clock to give it the 6 minutes to warm up.

My Experience With Using This Product:

Connoisseur

The Coffee I've Tried With This Product:

Lavazza, and beans from our local roaster

Some Improvements I Would Recommend for This Product:

Only two MINOR things... Upon my initial inspection the main power button could be in front, and not the back. But I have to say it hasn't been much of an issue, nothing else is in the back and I can reach around and push the button. The second item is the drip tray. It doesn't hold very much, not that it needs to, but I would prefer a bigger tray that only ever fills up part way, to smaller one that fills up most of the way. It does remove and lock in very easily.

Some of the Other Machines I've Used:

10 year old Saeco Via Veneto, with a non-pressurized portafilter

The Type of Grinder I've Been Using:

Burr Grinder

The Make and Model of My Grinder:

Solis Maestro

Show more...
Do You Find this Review Helpful?   Yes  No
Look for Expert Answers for This Product on:
Brewing (1) |  Cleaning & Maintenance (3) |  Troubleshooting (6) |  Warranty Info & Manuals (1) |  all expert answers (11)

Expert Answers

Question Submitted by Adam Dean
Product Manual click to open/closeopen and close answer
Question Submitted by Adam Dean
What do I do if my coffee flow is reduced or stopped altogether? click to open/closeopen and close answer
  • There are several possible causes of this problem. Please follow the instructions below to determine the cause:

    1. Turn the machine on.
    2. Let the machine heat up as usual.
    3. When the machine is hot, open the steam knob and then turn on the brew switch. You should hear the pump operate and you should see a constant stream of water exiting out of the steam wand. Turn off the brew switch and close the steam knob.
    4. If you did see a constant stream of water exiting out of the steam wand, proceed to step 5. If you do not see a constant stream of water exiting out of the steam wand, then there is most likely a problem with the pump. If this is the case, go to Solution 2.
    5. Without any coffee in the portafilter, lock it in place on the group head.
    6. Turn on the brew switch. If the machine cannot produce 2 oz of water in a 20 second brew cycle, the group head needs to be cleaned. If this is the case, follow Solution 1.

    Solution 1: Clean the grouphead:

    1. Ensure that the brew switch and steam knob are turned off and the machine is cold.
    2. Unplug the machine.
    3. Remove the reservoir, drip tray and drip pan and carefully lay the machine on its back.
    4. Use a short Phillips-head screwdriver to remove the shower screen. It is fastened into the group head with a chrome Phillips-head screw (if you damage the shower screen and/or screw, we have replacements available and they are not too expensive).
    5. Under the shower screen you will see the “Shower Holding Plate” that is held in place with 2 Allen screws. Remove the 2 Allen screws with a 5mm Allen wrench. Note: If the shower holding plate comes out after removing the 2 Allen screws, skip to step 6.
    If the shower holding plate does not come out after removing the 2 Allen screws, use a large flat blade screwdriver to gently pry out the Shower Holding Plate. Note: Be careful not to damage the ridge that the shower screen fits up into. If it still does not come out, you may need to apply some descaler solution in the gaps with a turkey baster or something similar. Be careful not to break or scratch the holding plate, but if this piece is damaged, you can purchase a replacement from us, and it is relatively inexpensive.
    6. Soak the shower holding plate and shower screen in descaler and use an old toothbrush or group brush to clean the shower screen. DO NOT push a pin through the holes in the screen. It can cause future clogs because it will enlarge the small holes.
    7. Rinse the parts thoroughly.
    8. Replace the Shower Holding Plate and Shower Screen.
    9. Tip the unit back up and replace the drip pan, drip tray and water reservoir.
    10. Fill the reservoir and plug the machine in and your machine should be ready to brew again.

    Solution 2

    If there is a problem with the pump, please call us to set up the machine for repair. We are an authorized repair center and can accept your machine for a repair.

    Comments (2)


    03/05/10 at 10:58 PM by Donna Greene
    I've tried all of it, too. This time it was working pretty well until I used Cleancaf and then the flow slowed way down and eventually stopped.

    10/11/09 at 03:42 AM by Sarah Dyer
    I've tried all this. Water does flow out of steam nozzle, but water still flowing to slow out of brew head. This prob keeps happening. What's wrong?

    Add A Comment


Question Submitted by Adam Dean
The pump is loud and no water comes out of the steam wand or group head click to open/closeopen and close answer
  • There are several possible causes of this problem. Please follow the instructions below to solve it.

    Solution 1

    The The most common solution to this problem is to re-prime your machine. If the water tank runs out or becomes low, or if the water inlet tube floats up in the reservoir and brings in air, it can cause a bubble of air to get caught in the pump. Follow these steps to resolve the issue:

    1. Unplug the machine and allow it to cool completely.
    2. First you need to get a turkey baster or something that can inject water with some pressure. If you do not have anything suitable please call us to order a priming pump.
    3. Look into the reservoir and find the soft tubes. There is usually 1 or 2. You will need to locate the inlet tube. It is usually the longer tube with a V-shaped cut or angled cut at the end. This is the tube you are going to inject water into. NOTE: if your machine has a water softener on it, remove this while priming.
    4. Plug in your machine and turn it on.
    5. Fill the turkey baster or priming pump with water.
    6. Open the steam knob.
    7. Press the brewing button. Note: Some models will need to have the steam and brew buttons depressed in order to have water only come out of the steam wand.
    8. Now the pump will activate. Quickly make a tight seal with the priming pump/turkey baster and the inlet tube and force water into the tube.
    9. As soon as you have injected the water, turn the pump off by turning off the brewing button (we recommend doing this step 2-3 times before going on to the next step).
    10. Once you see water being pulled through the machine, replace the tube into a FULL water reservoir and let the water run out of the steam wand for 1 minute or until you no longer see sputtering. Your machine is now re-primed and ready to use again.

    Solution 2

    The second most common solution to this problem is that your pump has become dislodged from its mount. You may be able to reset it yourself at home. Do not perform this if your machine is still within its warranty period. Please call our technical help line for instructions.

    Solution 3

    If the first two solutions do not work, you may need a new pump. Please call us to set up a repair.

    Add A Comment


Question Submitted by Tech Kathy
My machine powers on but it won't heat up click to open/closeopen and close answer
  • The most common solution to this problem is to replace one of the thermostats. Your machine has one thermostat for steaming and one for brewing. To determine which thermostat you need to replace, follow these instructions:

    1. Turn the machine on.
    2. Immediately put the machine into steam mode.
    3. Wait 20 minutes.
    4. Open the steam valve.
    5. If you get steam, you need a new brew thermostat. If you do not get steam, you need a new steam thermostat. Call us to order a replacement.

    When you are ready to install a new thermostat, follow these instructions:

    1. Unplug your machine.
    2. Remove the top panel on the machine as follows:

    Gaggia Classic- Remove the 2 screws on the top.

    Gaggia Baby and Baby D- Remove the single long screw in the funnel that leads to the reservoir. Then pull straight up on the steam knob. Under it is another screw that must be removed. Then lift off the top.

    3. Double check to make sure that it the machine is not plugged in.
    4. With the top of the machine removed, you can see the brew boiler. It is the large, silver component right over the brew group with all of the wires going to it. Note: Your machine has 2 thermostats. One for steaming and one for brewing. The one at the back of the top of the boiler is the steam thermostat. The one at the bottom left side of the boiler is the brew thermostat.
    5. Remove the 2 wires that are attached to the thermostat and use a wrench on the brass part of the thermostat to unscrew it.
    6. Put a little heat transfer compound on the bottom of the new thermostat and carefully screw it back into place. Note: To tighten it, turn the brass part of the thermostat only. Be sure it is snug, but do not to overtighten it.
    7. Insert the 2 wires on the thermostat.
    8. Replace the top panel and screws.
    9. Turn the main power switch on and test it out.

    If this did not solve the problem, please call us to set up the machine for repair. We are an authorized repair center and can accept your machine for a repair.

    Add A Comment


Question Submitted by Tech Kathy
What do I do if my machine leaks around the portafilter while brewing? click to open/closeopen and close answer
  • There are several possible causes of this problem. Please follow the instructions below to solve it.

    Solution 1

    This problem can occur if the metal filter basket in the portafilter is damaged around the edges, or if coffee has built-up on the edges. Ensure that your filter basket is clean around the edges, and if it is damaged, replacements are available on our Parts Page below.

    Solution 2

    The most common solution to this problem is to replace the group head gasket. You should install a new about once a year. It is easy to install and you can do it from home. First, you will need to get a new gasket. Please call us to order, or visit our parts page linked below. The gasket is a large, black circular rubber piece in the group head. This is where your machine makes a seal for pressure brewing. To replace it, follow these instructions:

    1. Unplug the machine.
    2. Remove the reservoir, drip tray and drip pan and carefully lay the machine on its back.
    3. Use a short Phillips-head screwdriver to remove the shower screen (if you damage the shower screen and/or screw, we have replacements available and they are not too expensive).
    4. Under the shower screen you will see the “Shower Holding Plate” that is held in place with 2 Allen screws. Remove the 2 Allen screws with a 5mm Allen wrench. Note: If the shower holding plate comes out after removing the 2 Allen screws, skip to step 6.
    If the shower holding plate does not come out after removing the 2 Allen screws, use a large flat blade screwdriver to gently pry out the Shower Holding Plate. Note: Be careful not to damage the ridge that the shower screen fits up into. If it still does not come out, you may need to apply some descaler solution in the gaps with a turkey baster or something similar. Be careful not to break or scratch the holding plate, but if this piece is damaged, you can purchase a replacement from us, and it is relatively inexpensive.
    5. Now locate the group gasket. It is a black rubber ring. You need to pry off the rubber gasket. It should easily come out. If it does, skip to step 8.
    6. If the rubber gasket is difficult to remove by hand, find a couple of screws that you might have lying around. They do not have to be any special size, but a sheet metal screw with a 5/16-inch or 1/4-inch six sided head and a ratchet works best. Screw them into the old gasket. Make sure that they are across from each other. Note: Do not screw them in completely through the gasket—just screw them in far enough to get a good grip. You can judge this by looking at the new gasket you are going to install. The gasket depth is about 5/16-inch.
    7. Use pliers to pull on the screws and work the old gasket out. Pull one side and then the other until it comes out.
    8. At this point, it is a good idea to clean the shower screen and group head. DO NOT use a pin to clean out the holes in the shower screen. It can cause future clogs because it will enlarge the small holes.
    9. Clean and dry the slot in the machine that the gasket fits into.
    10. Slide a new gasket into place.
    11. Replace the Shower Holding Plate and Shower Screen.
    12. Tip the unit back up and install the drip pan, drip tray and water reservoir.
    Fill the reservoir and plug the machine in and your machine should be ready to brew again.

    Parts Page

    Add A Comment


Question Submitted by Tech Kathy
How do I change my group gasket? click to open/closeopen and close answer
  • You should install a new group gasket about once a year. It is easy to install and you can do it from home. First, you will need to get a new gasket. Please call us to order, or visit our parts page linked below. The gasket is a large, black circular rubber piece in the group head. This is where your machine makes a seal for pressure brewing. To replace it, follow these instructions:

    1. Unplug the machine.
    2. Remove the reservoir, drip tray and drip pan and carefully lay the machine on its back.
    3. Use a short Phillips-head screwdriver to remove the shower screen (if you damage the shower screen and/or screw, we have replacements available and they are not too expensive).
    4. Under the shower screen you will see the “Shower Holding Plate” that is held in place with 2 Allen screws. Remove the 2 Allen screws with a 5mm Allen wrench. Note: If the shower holding plate comes out after removing the 2 Allen screws, skip to step 6.
    If the shower holding plate does not come out after removing the 2 Allen screws, use a large flat blade screwdriver to gently pry out the Shower Holding Plate. Note: Be careful not to damage the ridge that the shower screen fits up into. If it still does not come out, you may need to apply some descaler solution in the gaps with a turkey baster or something similar. Be careful not to break or scratch the holding plate, but if this piece is damaged, you can purchase a replacement from us, and it is relatively inexpensive.
    5. Now locate the group gasket. It is a black rubber ring. You need to pry off the rubber gasket. It should easily come out. If it does, skip to step 8.
    6. If the rubber gasket is difficult to remove by hand, find a couple of screws that you might have lying around. They do not have to be any special size, but a sheet metal screw with a 5/16-inch or 1/4-inch six sided head and a ratchet works best. Screw them into the old gasket. Make sure that they are across from each other. Note: Do not screw them in completely through the gasket—just screw them in far enough to get a good grip. You can judge this by looking at the new gasket you are going to install. The gasket depth is about 5/16-inch.
    7. Use pliers to pull on the screws and work the old gasket out. Pull one side and then the other until it comes out.
    8. At this point, it is a good idea to clean the shower screen and group head. DO NOT use a pin to clean out the holes in the shower screen. It can cause future clogs because it will enlarge the small holes.
    9. Clean and dry the slot in the machine that the gasket fits into.
    10. Slide a new gasket into place.
    11. Replace the Shower Holding Plate and Shower Screen.
    12. Tip the unit back up and install the drip pan, drip tray and water reservoir.
    13. Fill the reservoir and plug the machine in and your machine should be ready to brew again.

    Parts Page

    Comments (1)


    05/21/10 at 05:30 PM by Richard Fowler
    If the shower plate is stuck then get an ~ 1 inch x 5mm screw. Screw this through the center hole and it will push the plate up.

    Add A Comment


Question Submitted by Tech Kathy
My machine will not power on click to open/closeopen and close answer
  • The most common solution to this problem is to replace a fuse in your machine. This is a relatively simple process that only requires a few tools. Please call us to order fuse DM1040. When you are ready to install this fuse, follow these instructions:

    1. Unplug your machine.
    2. Remove the top panel on the machine as follows:

    Gaggia Classic and Gaggia Coffee- Remove the 2 screws on the top.

    Gaggia Carezza
    a) Remove the single screw in the funnel that leads to the reservoir.
    b) Remove the screw on top of the steam knob.
    c) Remove the steam knob.

    Gaggia Espresso- Remove the single long screw in the funnel that leads to the reservoir. Note: Be careful when removing the top of the Gaggia Espresso, do not force it or it may crack.

    3. With the top of the machine removed, you can see the brew boiler. It is the large, silver component right over the brew group with all of the wires going to it.
    4. Locate the Phillips-head screw on top of the boiler that is holding down a brass-colored clip. It should be on the left-hand side if you are facing the front of the machine.
    5. Under the brass-colored clip, locate the semi-clear soft tube with wires coming out of both ends of it. The fuse link is in this soft tube.
    6. Remove the Phillips-head screw and cut the 2 small plastic ties at either end of the rubber tube.
    7. Slide the rubber tube toward the front of the machine. You may have to move the switches on the machine if they are in the way. You will also have to cut 2 or three plastic ties that hold the wires together so that you may move the rubber tube forward.
    8. Leave the rubber tube on the wires so that you can slide it back over the new fuse.
    9. Taking note of where each wire connects to the, cut the wires that lead to both sides of the fuse. Note: Cut it very close to the existing crimp connector so that the wires will not be overly shortened.
    10. Strip the wires that you just cut back about ¼-inch. This will expose the metal part of the wires.
    11. Before you install the new fuse, make sure that that the rubber tube will be long enough to cover the whole fuse and that it connects with at least ¼-inch to spare. Cut the fuse shorter if necessary.
    12. Install the new fuse (it does not matter which way it faces) using the crimp connectors provided. The connectors are 2 different sizes. The small one is for the single wire from the front of the boiler and the larger connector is for the 2 wires coming from the back of the boiler.
    13. Crimp the connectors onto the wire and fuse firmly, but not so firm as to cut the connector.
    14. Gently tug on the fuse and the wire to make sure that there is no movement and the connection is secure.
    15. Slide the rubber tube over the fuse. Note: Make sure that that all exposed wires and the fuse are inside of the rubber tube.
    16. Install new wire zip ties on the ends of the fuse link and replace any that where cut when moving the rubber tube.
    17. Replace the brass-colored clip and Phillips-head screw, making sure that the fat part of the fuse link is located under the clip.
    18. Make sure that the fuse and rubber tube are securely held in place by the clip. Put the machine back together, plug it in and test it out.

    If this solution does not work, please call us to set up the machine for repair. We are an authorized repair center.

    Add A Comment


Question Submitted by Tech Kathy
How do I clean the shower screen? click to open/closeopen and close answer
  • The shower screen is located right above where the portafilter attaches to the brew group. It is used to evenly disperse water over the coffee grounds when you brew. As a daily maintenance routine, you should remove the portafilter after brewing and then press the brew button for a few seconds to let the water clean off any grounds that may be stuck to the screen.

    More thorough cleaning should be done about once every other week to keep the machine working at its best. To clean the shower screen thoroughly, follow these instructions:

    1. Use a short Phillips-head screwdriver to remove the screw in the center of the shower screen. The shower screen should fall out into your hand.
    2. Soak the screen and screw in descaler and use an old toothbrush or group brush to clean them. DO NOT push a pin through the holes in the screen. It can cause future clogs because it will enlarge the small holes.
    3. Rinse the shower screen and screw thoroughly.
    4. Replace the shower screen and screw.

    Gaggia Shower Screen

    Group Brush

    Add A Comment


Question Submitted by Tech Kathy
How do I descale/decalcify my machine? click to open/closeopen and close answer
  • First, descaling and decalcifying are the same thing. When you descale your machine, you are removing the calcium and mineral build-up in the boiler, brew group, frothing wand, and other related parts. You should descale your machine every 2-3 months. If you use reverse osmosis water or distilled water, you should descale about every 5-6 months.

    The first thing you will need is a descaling agent. Urnex Cleancaf or Durgol are the best for almost all espresso machines and coffee makers. Do NOT just use any product that claims to remove calcium and lime. Many products you can purchase at the local store can be harsh enough to ruin your boiler and cause leaks. Some are even poisonous. CLR or Dip it! are general descalers and are made more for coffee carafes. Lemon juice or vinegar can be absorbed into some of the components of the machine causing a very sour taste. Make sure the cleaner that you select is specifically for espresso machines and/or coffee machines.

    To descale your machine, follow these steps:

    1) Remove the machine’s water reservoir.
    2) Empty all liquid from the reservoir.
    3) Mix the cleaner/descaler according to the manufacturer’s directions.
    4) Return the water reservoir to the machine.
    5) Turn the machine on.
    6) Place a large container underneath the steam wand to collect the decalcifying solution.
    7) Place another small container underneath the brew spout to collect more of the decalcifying solution.
    8) Set up your machine so that hot water -NOT steam- will be emitted from the steam wand when the steam valve is opened.
    9) To start the decalcifying process, press the "brew" button (some models must have the brew and steam buttons pressed in order for water to exit the wand only).
    10) While pressing the "brew" button, open the steam valve.
    11) Allow about 8 oz of water to be dispensed from the machine.
    12) Turn off the brew button.
    13) Close the steam valve.
    14) Allow the machine to sit for the amount of time specified on the cleaner packaging. If no time is specified, 5-6 minutes is usually enough.
    15) Repeat steps 9 through 14 until all of the decalcifying solution has drained into the containers.
    16) Remove the containers and discard the collected liquid.
    17) Rinse the water reservoir thoroughly and then fill it with your usual water for brewing.
    18) Place the water reservoir back in its normal position.
    19) Rinse out the decalcifying solution by repeating steps 6 through 10 until the water reservoir is empty again. You can repeat the rinsing cycle if you wish.

    Your machine should now be ready to brew again.

    Why Decalcify?

    Cleaning Products page

    Add A Comment


Question Submitted by jennifer franklin
More coffee comes out of one spout than the other when I brew. click to open/closeopen and close answer
  • There are several possible causes of this problem. Please follow the instructions below to determine the cause:

    Solution 1

    The most common cause is an uneven tamp. Make sure that you’re not tamping more heavily on one side of the portafilter, as water will try to find its way through the path of least resistance - the more lightly tamped side. If you’ve determined that this isn’t the case, you may want to clean the shower screen. Follow Solution 2 for instructions.

    Solution 2

    The shower screen is located right above where the portafilter attaches to the brew group. It is used to evenly disperse water over the coffee grounds when you brew. As a daily maintenance routine, you should remove the portafilter after brewing and then press the brew button for a few seconds to let the water clean off any grounds that may be stuck to the screen.

    More thorough cleaning should be done about once every other week to keep the machine working at its best. To clean the shower screen thoroughly, follow these instructions:

    1. Use a short Phillips-head screwdriver to remove the screw in the center of the shower screen. The shower screen should fall out into your hand.
    2. Soak the screen and screw in descaler and use an old toothbrush or group brush to clean them. DO NOT push a pin through the holes in the screen. It can cause future clogs because it will enlarge the small holes.
    3. Rinse the shower screen and screw thoroughly.
    4. Replace the shower screen and screw.

    Add A Comment


Question Submitted by
What is the Golden Rule? click to open/closeopen and close answer
  • Very basically, the Golden Rule states that using the correct amount of coffee (based on a single or double shot) should produce a shot of espresso in 20 to 25 seconds. Changing the grind setting or the amount of tamp pressure you are using will change how quickly the shot is produced. Follow the links below to find more in depth discussions of the Golden Rule.

    Golden Rule
    Purchasing Coffee & Brewing Espresso PART I
    Purchasing Coffee & Brewing Espresso PART II
    Rituals of Making Espresso

    Comments (2)


    09/12/09 at 05:15 AM by calum swanson
    What could be causing my Gaggia Baby Twin to be cutting out. It comes on as normal and seems to cut out after a few minutes.

    11/20/08 at 09:33 AM by Carrie Nelson
    Please explain benefits and draw-backs of going from Rancilio Silvia to an Epoca. We have used the Silvia for 2yrs, love it, but need more volume.

    Add A Comment


facebook Twitter youtube google + blog blog

888-411-5282

Hours of Operation
Monday - Thursday - 9 AM to 8 PM EST
Friday - 9 AM to 6 PM
Saturday - 10 AM to 3 PM (Sales Only)
Sunday - Closed

Whole Latte Love - 2200 Brighton Henrietta Town Line Rd, Rochester, NY 14623
Copyright © 2012 Whole Latte Love . All rights reserved.

Have questions? Need assistance? We can help! Call or Email us...CLICK HERE!