USA
USA


Cold Brew: What It Is And How To Make It
Updated for 2026

Over the past 15 years, cold-brewed coffee has become a customer favorite in coffee shops, and has since spread to canned or bottled products in grocery stores, even being found on tap in some establishments. It’s a smoother, less acidic alternative to traditional iced coffee, and if you know what you’re doing, it’s highly versatile as well. In this article, we’ll walk you through what cold brew is, why it tastes different from traditional iced coffee, and most importantly, how to make it.
What Is Cold Brew?
Cold brew is, for the most part, exactly what it sounds like: it’s coffee that was brewed with cold water instead of hot water. This is done in any kind of a vessel where water and ground coffee can sit together for a prolonged period of time, followed by straining or filtering the grounds when it’s time to stop the brew. The flavor is lower in acidity and often produces deep, sweet chocolate notes. It’s also known to have a higher caffeine content and can be higher in sheer strength of flavor, but more on that later.

Iced Coffee Vs Cold Brew
Iced coffee and cold brew will differ significantly in flavor, prep time, method, and caffeine content. Let’s break it down:
Flavor
When making iced coffee, you can make a concentrated brew directly over ice, or, my least favorite method that I still sometimes see: you can brew hot coffee and let it cool down over time, or in the refrigerator (please don’t, though). Hot water brings out more acidity and bitterness in coffee, whereas cold water does not; at least, not to the extent that hot water does. As a result, while your iced coffee can potentially taste more complex than cold brew, the hot water makes extraction a bit less forgiving.
Trading Heat For Time
With cold brew, since there isn’t any heat doing the work of extracting the soluble coffee material, time ends up being the force that does the extracting. An iced coffee can be ready in 3+ minutes, but when there’s no hot water involved, cold brew needs anywhere from 8 to 24 hours to produce your desired strength.
Caffeine
While hot water does bring out more acidity and bitterness, it doesn’t really bring out more caffeine. Time is what caffeine responds to. This means that thanks to the long brew time, a glass of cold brew has more caffeine than a traditional iced coffee (and you’ve probably noticed that if you’re already a cold brew drinker).
This translates to other brew methods as well: An espresso brewed with 18 grams of coffee that takes 27 seconds to brew will have less caffeine than an 18 gram pour-over that was brewed in 3 minutes. The more time the coffee has with the water, the more caffeine ends up in the cup.
The Occasional Price Tag
Sometimes, cold brew can cost more than iced coffee. This will vary from coffee shop to coffee shop, but a gallon of iced coffee at a typical 1:16 ratio of coffee to water uses 236 grams of coffee (yes, some of the water weight is ice, meant to melt). But many coffee shops use a 1:10 ratio for their cold brew, which comes to about 379 grams of coffee; that’s almost 40% more than what’s needed for iced coffee. Again, this varies shop-to-shop, and the ratio being used is largely dependent on the coffee being used.
Grind Size & Ratio
Grind Size

The rule of thumb for cold brew grind size is usually very coarse; around the French Press range. This brew method takes so long that the water will have no problem permeating these large particles. But to me, the biggest reason to use a coarse grind is to avoid clogging during the filtering step, especially when making a big batch.
Ratios
If you regularly make a pour-over, you’re familiar with the good old-fashioned 1 to 16 ratio: that’s one part coffee to 16 parts water, by weight. For example, 20 grams of coffee to 320 grams of water is a 1:16 ratio. This is usually where I start when I’m working on any kind of filter recipe with a new coffee. Cold brew behaves a bit differently and is pretty versatile too.
Many coffee shops will make a cold brew concentrate at a 1:5 ratio (that’s A LOT of coffee). The baristas will later dilute the concentrate into a drinkable cup, technically allowing them to make more cups of cold brew without taking up so much refrigerator space.

One of the most common cold brew ratios is 1:10. Depending on the roast level of the coffee you’re using, a classic 1:16 ratio that you would use for a pourover just doesn’t deliver the strength of flavor most people are looking for. Still, many will brew a 1:10 ratio and dilute it as if it was a concentrate.
And of course, many will brew at the trusty 1:16 ratio with no dilution.
Pro-tip when making larger batches: You can calculate your ratio using milliliters. Milliliters convert at a nearly 1:1 ratio to grams. So, if you’re making cold brew up to the 2.5-liter mark on a large foodsafe bucket, that’s 2,500 milliliters. If you want to make a concentrate at a 1:5 ratio, just divide 2,500 by 5, and you’ll find that you need 500 grams of ground coffee for your recipe.
How to Make Cold Brew

I’ll provide a few examples of how to make cold brew, including a commercial bucket, old fashioned jar, French Press, the Varia Steep.
The Bucket Method
The Toddy brand is one of cold brew’s best friends, and their product lineup includes Commercial Cold Brew Filters, which are basically a bag made out of coffee filter material. These can fit in a 5-gallon bucket, making them perfect for a coffee shop or a busy household. You can also use a cheesecloth, although these can get a bit messy when it comes time to strain.
Pro-tip: Use a commercial filter AND a cheesecloth. By putting the filter inside the cheesecloth, you’ll prevent the filter from splitting during straining if you get a bit aggressive with your handling. If you use ONLY a cheesecloth, it will be very difficult to get all the grounds totally cleaned off after brewing.
To brew with this style of filter, simply load the filter with your ground coffee dose and put the filter in a bucket. Then, pour half of the water inside the bag and stir a bit to make sure all of the grounds have received some water. Then, tie the bag and pour the rest of the water into the bucket.
Next, put a lid on the bucket and forget about it for a while. It doesn’t need to be refrigerated; it’s tough to fit a big bucket in a refrigerator anyway. Plus, countertop brewing is both common and safe, even in some commercial environments. However, my own personal recommendation is to make sure the bucket is completely clean and sanitized before brewing.
Don’t get me wrong: If you do have the space, my preference is always to steep in the refrigerator. The cooler environment surprisingly doesn’t do much to the extraction time. To avoid off-flavors, keep a tight lid on the bucket as the brew will soak up any odors in the refrigerator.
Using a Jar or French Press

Brewing with a jar or French Press is even easier. Simply add your coffee dose and water according to your selected ratio, and stir. If you’re using a jar, do put the lid on, and with a French Press, use plastic wrap to seal the brew. For these smaller batches, there’s no reason not to let them steep in the refrigerator. We’ll discuss straining in just a bit.

Using the Varia Steep
Varia’s Steep Cold Brew Bottle is one of the easiest cold brew devices we carry. Simply fill the grounds chamber with 60g of coarse ground coffee. Then, fill the glass chamber with 600g of water. In fact, most people don’t even measure the water and just fill it nearly to the top. Put the entire brewer in the refrigerator and let the grounds chamber steep in the glass bottle. As far as developing a recipe with this brewer, there’s only so many ways to use it. For example, you can’t make a concentrate with this device since the grounds won’t get completely saturated with a smaller amount of water.
Deciding How Long To Steep
By around 8 hours, all of the caffeine should have been extracted. I recommend steeping for at least 12 to 16 hours as most of the flavor will have been extracted by that point.
From here, the longer you steep, the more subtle flavors will be drawn out of the coffee. So how long should you steep? If you’ve ever read or watched any of my work, you know I always say that it all depends on what the coffee needs, and the only way to crack that code is by tasting it.

If you have a bucket with a spigot, you can try a sample of the brew at 12 hours, 14 hours, 16 hours, 20 hours, 24 hours… as often as you want, really. You can’t really overextract cold brew, but you still won’t need to steep more than 24 hours.
Straining
If you’re using a commercial filter, it’s best to pick up the filter bag and squeeze some brewed coffee out of the bag—there’s still a lot of good stuff in there! This is where the cheesecloth can be helpful: you can squeeze the bag more intentionally without worrying about splitting the filter and dealing with grounds everywhere.
If you’re using a jar, DON’T stir. You want all of the finer coffee particulate at the bottom to stay there. Feel free to use any basket and paper filter you’ve got, whether it’s the one in your auto-drip pot or a pour-over device and filter. Pour the brew over the paper filter to strain.

If you’re using a French Press, you can slowly press the plunger to separate the grounds from the cold brew. Alternatively, for a cleaner mouthfeel, skip the plunger altogether and just employ the paper filter method by pouring the brew over a device with a paper filter.
The Varia Steep is the easiest of all since the grounds chamber contains a mesh filter. All you need to do is remove the grounds chamber, dump the grounds out, and rinse. The cold brew left behind in the brewing chamber also happens to be the bottle you can drink out of or pour out of.
Dilution
If you’re intentionally brewing a concentrate, you’ll want to dilute it with additional water. I performed my own experiment with dilution. I made a 1:5 cold brew concentrate with our Colombia Tolima and steeped it for 24 hours. That concentrate measured a whopping 4% TDS (Total Dissolved Solids, a measure of strength). For reference, a hot cup of coffee is typically around 1.35% TDS, about a third of the strength of my concentrate.

My brew yielded 185 mL of concentrated cold brew. I diluted it with another 185 mL of water, which then measured a strength of 1.98% TDS. This was not only strong by the numbers, but still tasted a bit over-the-top. I diluted further with another 30 mL of water to get a chocolatey, slightly citrusy, sweet, crisp tasting 1.64% TDS.
I don’t expect anyone to figure out the best dilution by using a refractometer and taking TDS readings; this kind of trial-and-error can be done by taste as well. If you ARE using a refractometer, it’s not uncommon for a tasty cold brew to register higher TDS than hot coffee.
Ever Had a Cold Brew Latte?

I saved some of my cold brew concentrate, but didn’t dilute with water. Instead, I diluted it with milk for a strong, creamy iced latte with a smoother, sweeter coffee flavor (a cold brew latte with a little vanilla syrup is one of my favorite summertime treats). Medium roasts, and even coffees roasted a bit past medium can work very well for this kind of application.
Coffee Recommendations for Cold Brewing
As always, your choice of coffee goes a long way, depending on what you’re looking for. Baristas are often hesitant to cold brew with denser, high-scoring, expensive specialty coffees. But recently, coffee enthusiasts are finding that even high-end specialty coffees, like Gesha varietals are being cold brewed, and producing delicate floral notes, proving that cold brew doesn’t need to be as one-dimensional as we once thought.
All this to say: don’t be afraid to experiment and have fun with cold brew. I’ve got a list of my coffee recommendations from the Whole Latte Love lineup below, but to be clear, you can cold brew anything.

Colombia Tolima
I used this coffee for my experiment above. I got some nice crispy citrus notes wrapped up in milk chocolate.
Ethiopia Limmu
Expect sweetness from this coffee as a cold brew, particularly a berry sweetness, also wrapped up in those milk chocolate notes we find from medium-roasted coffees.
Hidden Malabar
This Indian Malabar coffee will yield a darker chocolate profile, and might do well with a traditional 1:16 ratio, though you can always make a concentrate if you’re low on refrigerator space.
Italian Stallion
This collaboration blend roasted by our Italian roasting partners, Maromas, will have the classic roasty notes you can expect from a traditional Italian roaster. This blend may not need as much time to fully extract everything, and this blend as well as the Hidden Malabar will taste excellent if you want to try that Cold Brew Latte discussed above.
Decaf Crema Wave
I love our Crema Wave Decaf. This coffee comes out very sweet as an espresso, and you can expect the same complex sweetness as a cold brew as well.

Final Thoughts: Cold Brew Complex
This is just scratching the surface into the world of cold brew. I’ve seen cold brew be viewed as a method that you save for a coffee you’re not that excited about, or sometimes the last stop in a coffee’s shelf-life. Between your coffee choice, brew ratio, steep time, filtering method, and dilution ratio, cold brew can be a much more complex beverage, ripe for experimentation.
Photography by Grace Walker
Shop This Blog
-
 The Varia Steep Cold Brew Bottle is an easy and affordable way to enjoy the delight of cold brew coffee from home. The revolutionary 60 g closed-basket system thoroughly saturates the coffee for improved extraction without allowing grounds to escape, making for cleaner, less gritty coffee.
 -
 The AKU scale from Varia is a compact and precise coffee and espresso scale with a waterproof design and 0.1 gram accuracy. Its aluminum housing imparts a premium tactile feel not found in competing scales at this price.
 -
 Set of 50 paper filters for the Toddy® commercial cold brew system.
 -
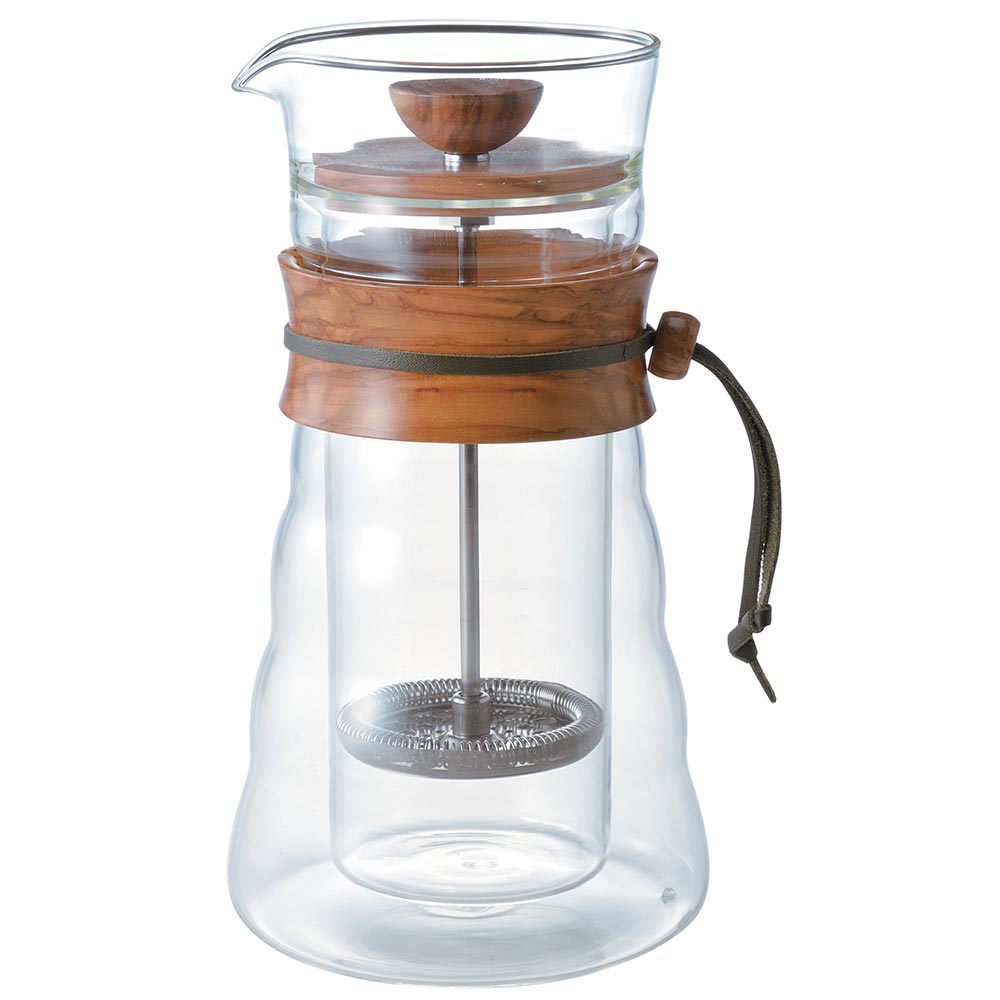 Hario Double Glass Olive Wood Coffee Press Overview Hario presents you with their own unique take on French Press brewing. The double-walled design of the press insul...
 -
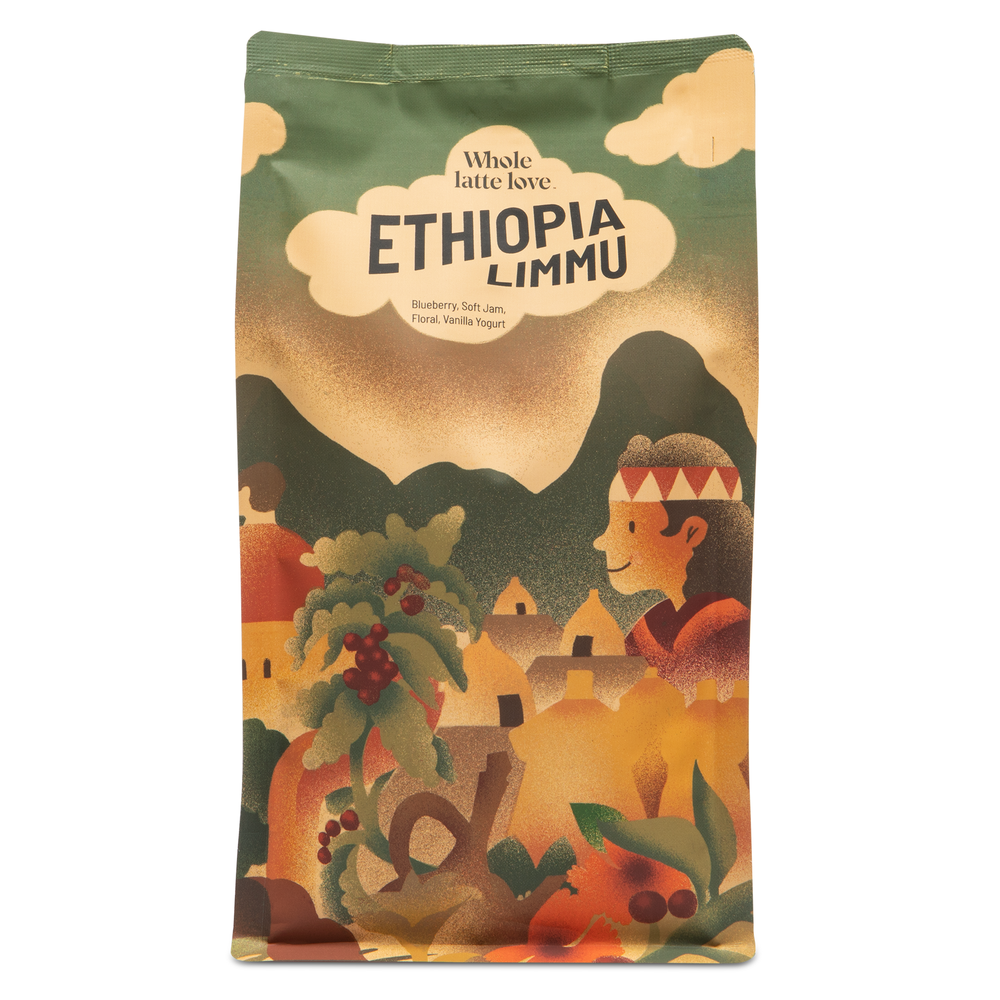 Our natural process Ethiopia G1 Limmu coffee is composed of heirloom varietals, is organically grown, sustainably sourced and bursting with fruity flavor.
 -
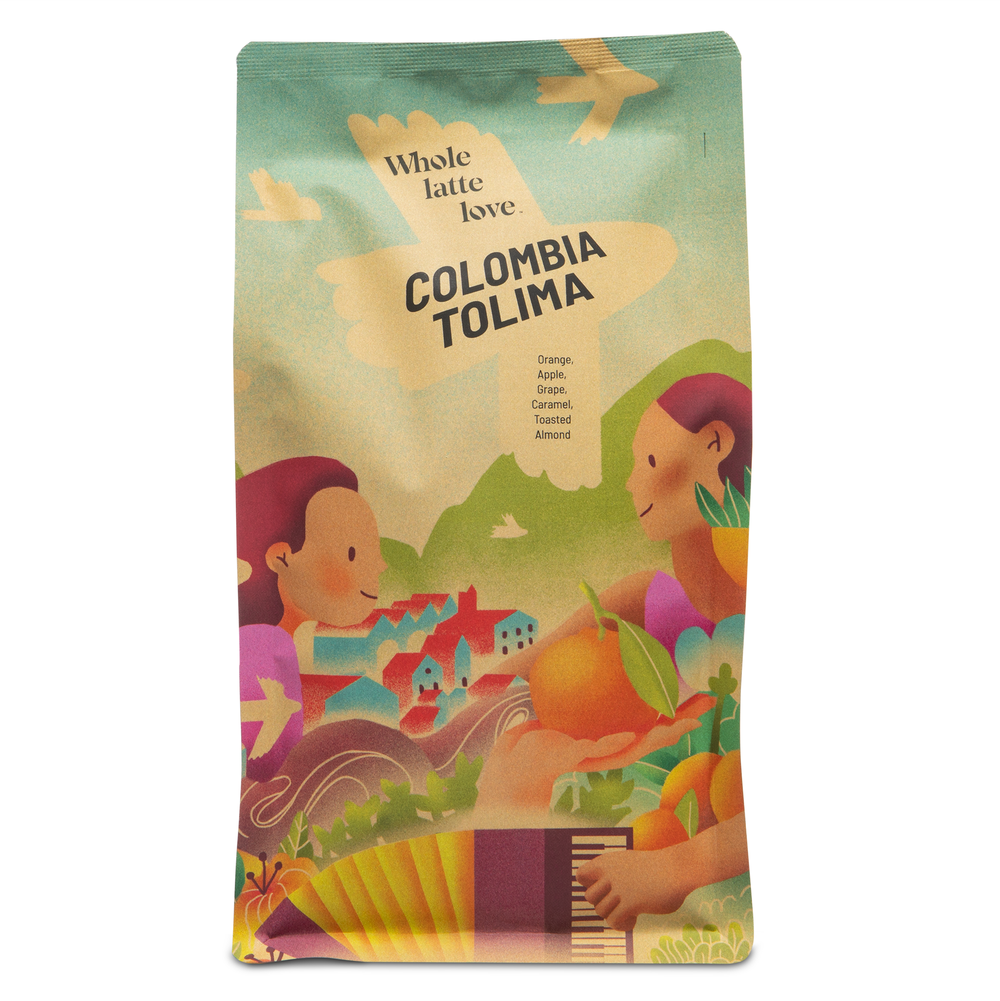 Our Colombia Tolima coffee blends Castillo and Caturra beans. It's organically grown, sustainably sourced, and bright and balanced with comforting flavors.
 -
 Crema Wave Decaf is a Swiss Water Process, whole bean decaf coffee that has been blended and roasted to match the crowd pleasing notes of its caffeinated counterpart.
 -
 Our Hidden Malabar whole bean coffee is composed of single-origin beans from the Mountainous Southern Regions of Mysore Coorg, India with naturally lower acidity and chocolaty sweetness thanks to the unique "Monsoon" process.
 -
 Italian Stallion is an espresso blend with bold dark chocolate notes alongside playful hints of popcorn and blueberry.
 -
 Baratza's Encore ESP Pro is an espresso focused, all-purpose grinder with stepless adjustment and a digital readout of your current grind setting. The ESP Pro features dedicated modes for both timed and single-dose grinding.


Related Articles

A Guide to Whole Latte Love Coffees

Sonoran Horchata